There are two types of DFS systems: standalone and fault tolerant. A standalone DFS system stores information on one server. The drawback to this kind of setup is that if the server fails, your DFS goes down. A fault tolerant system stores the DFS information in Active Directory (AD). This type of system gives you replication and fault tolerance.
Creating a DFS root:
Before you can access any DFS shares, you must first create a DFS root. The DFS root object stores all the links to your shares and files. I think of the DFS root as an empty container that holds links to all of my shared folders spread throughout my network. Before creating your DFS root, compile a list of all network shares on your system. This helps when the time comes for setting up DFS links, which we’ll discuss later in this article.
To create a DFS Root:
1. From the Start menu, select Administrative Tools | Distributed File System to access the Microsoft Management Console shown in Figure A.
Figure A
2. Right-click on the Distributed File System and select New DFS Root to launch the New DFS Root Wizard.
3. Click Next and select the type of DFS root you want to create from the screen shown in
Figure B.
Figure B
4. Select the Domain and click Next.
5. Enter the fully qualified domain name (FQDN) of the host server, as shown in Figure C, and then click Next.
Figure C
6. Select a DFS root share from the screen shown in Figure D and click Next.
Figure D
7. Click Next and then click Finish, and you’ll see something similar to Figure E.
Figure E
After you create the DFS root, you can check the status of the installation by right-clicking on your DFS root and selecting Check Status, as shown in Figure F. If you have configured the DFS root properly, you’ll see a green checkmark inside a circle.
Figure F
Create the DSF links:
1.Right-click on your DFS root and select New DFS Link.
2. Enter the name of the DFS link.
3. Browse your network to the shared folder, as we’ve done in Figure G, and click OK.
Figure G
4. Right-click on the new link and choose Check Status. Again, you’ll want to look for the green check mark inside the white circle to verify that it is running (Figure H).
Figure H
After establishing your links to the desired shared files on your network, you will want to publish the shares in Active Directory.
1.Select Active Directory Users And Computers from the Administrative Tools folder. Right-click on your domain and choose New | Shared Folder.
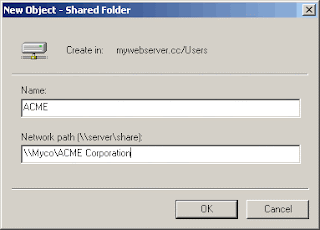
2. Enter the name and network path to the DFS share, as shown in Figure I, and click OK.
Figure I
Now that you have published your share in AD, you can have users view the share by either mapping a drive or by choosing My Network Places | Entire Network | View Entire Contents | Directory | The name of your share (ACME Corporation, in our example) as seen in Figure J and Figure K.
Figure J
Figure K
Replication:
Replication allows you to share folders and DFS links to other DFS roots in a domain. It also provides excellent fault tolerance in case a server crashes or has to be rebooted. You can replicate on a DFS shared folder or a DFS root.
The most important aspect of DFS is the DFS root. I say this because if the DFS root goes down or crashes and you do not have replication of the DFS root configured, your DFS tree is inaccessible.
To configure replication for the DFS root, right-click on the DFS Root and select New Root Replica. You will then need to enter the name of the server you want to copy the root to. To set the replication policy:
1. Open DFS from the Administrative Tools folder.
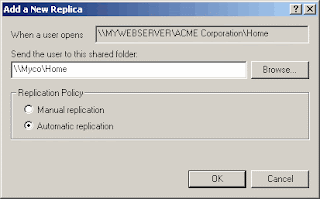
2. Right-click on a link and choose New Replica to open the Add A New Replica dialog box, shown in Figure L.
Figure L
DFS replicates files every 15 minutes on NTFS partitions; you must manually replicate Fat32 partitions.


