Monday, March 18, 2013

各种存储空间相片链接效果

Untitled Document 目的:寻找适合网页链接的相片存储空间
内容: Picasa, Skydrive, Baidu, Box
1.Skydrive 和Picasa提供预览和嵌入。Picasa还提供Slideshow嵌入。Baidu 不提供嵌入。 Box不提供直接预览。
2. Skydrive和 Picasa界面略有不同,个人比较喜欢Picasa,但Picasa在中国看不到。
3. Skydrive和Baidu在中国能顺利登陆。
结论: 若不考虑中国用户,Picasa效果最佳。若考虑中国用户,使用Skydrive。

Spry链接效果
From Picasa
Content 1
Content 2
From Skydrive
Content 1
Content 2
From Baidu
Content 1
Content 2
嵌入效果
Picasa:
Yoho National Park,2012

SkyDrive:


Baidu: 不提供嵌入。
Box: 不提供嵌入。


Tuesday, February 19, 2013

Configure Distributed File System (DFS)

There are two types of DFS systems: standalone and fault tolerant. A standalone DFS system stores information on one server. The drawback to this kind of setup is that if the server fails, your DFS goes down. A fault tolerant system stores the DFS information in Active Directory (AD). This type of system gives you replication and fault tolerance.

Creating a DFS root:
Before you can access any DFS shares, you must first create a DFS root. The DFS root object stores all the links to your shares and files. I think of the DFS root as an empty container that holds links to all of my shared folders spread throughout my network. Before creating your DFS root, compile a list of all network shares on your system. This helps when the time comes for setting up DFS links, which we’ll discuss later in this article.

To create a DFS Root:

1. From the Start menu, select Administrative Tools | Distributed File System to access the Microsoft  Management Console shown in Figure A.

                                                                         Figure A

2. Right-click on the Distributed File System and select New DFS Root to launch the New DFS Root Wizard.

3. Click Next and select the type of DFS root you want to create from the screen shown in
Figure B.

                                                                         Figure B

4. Select the Domain and click Next.

5. Enter the fully qualified domain name (FQDN) of the host server, as shown in Figure C, and then click  Next.

                                                                      Figure C
6. Select a DFS root share from the screen shown in Figure D and click Next.

                                                                    Figure D

7. Click Next and then click Finish, and you’ll see something similar to Figure E.

                                                                   Figure E

After you create the DFS root, you can check the status of the installation by right-clicking on your DFS root and selecting Check Status, as shown in Figure F. If you have configured the DFS root properly, you’ll see a green checkmark inside a circle.

                                                                        Figure F


Now that you have configured your DFS root, you’re ready to create links to your shared folders that are located throughout your network. Follow these steps to create the DFS links.

Create the DSF links:

1.Right-click on your DFS root and select New DFS Link.

2. Enter the name of the DFS link.

3. Browse your network to the shared folder, as we’ve done in Figure G, and click OK.

                                                                   
                                                                        Figure G

4. Right-click on the new link and choose Check Status. Again, you’ll want to look for the green check mark inside the white circle to verify that it is running (Figure H).

                                                                         Figure H

After establishing your links to the desired shared files on your network, you will want to publish the shares in Active Directory.

Publish a share in AD:

1.Select Active Directory Users And Computers from the Administrative Tools folder. Right-click on your domain and choose New | Shared Folder.

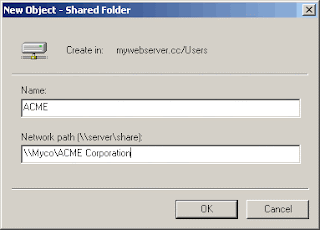
2. Enter the name and network path to the DFS share, as shown in Figure I, and click OK.

                                                                          Figure I


Now that you have published your share in AD, you can have users view the share by either mapping a drive or by choosing My Network Places | Entire Network | View Entire Contents | Directory | The name of your share (ACME Corporation, in our example) as seen in Figure J and Figure K.


Figure J


                                                                          Figure K

Replication:

Replication allows you to share folders and DFS links to other DFS roots in a domain. It also provides excellent fault tolerance in case a server crashes or has to be rebooted. You can replicate on a DFS shared folder or a DFS root.

The most important aspect of DFS is the DFS root. I say this because if the DFS root goes down or crashes and you do not have replication of the DFS root configured, your DFS tree is inaccessible.

To configure replication for the DFS root, right-click on the DFS Root and select New Root Replica. You will then need to enter the name of the server you want to copy the root to. To set the replication policy:

1. Open DFS from the Administrative Tools folder.

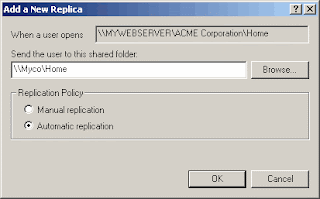
2. Right-click on a link and choose New Replica to open the Add A New Replica dialog box, shown in Figure L.

                                                                         Figure L

DFS replicates files every 15 minutes on NTFS partitions; you must manually replicate Fat32 partitions.

Friday, February 8, 2013

Transfer Outlook auto-complete from Outlook 2007 to Outlook 2010

Outlook has an function to suggest email addresses as you start to type them in, commonly known as the 'auto-complete' feature.
It works by keeping a list of people you've emailed so when you go to write a new email address and start filling out the 'to', 'cc' or 'bcc' field it will suggest the similar email addresses.
This information is stored in a file called 'outlook.nk2' (please note, the name depends on what you called your mail profile - so it may be different)
Unfortunately if you upgrade from Office 2007 to Office 2010 or move to a new computer this list is not transferred.
You can transfer the list by taking a copy of the file which Outlook 2007 saved it in and then importing it into Outlook 2010.
If you simply upgraded from Outlook 2007 to Outlook 2010:
1. Type outlook.exe /importnk2, and then click OK.
2. This should import the .nk2 file into the Outlook 2010 profile.
If you're moving to a new computer:
1. First you need to find you original file, depending on if you're using Windows XP or Windows 7 it may be in two different places
      *  Windows XP: C:\Documents and Settings\%username%\Application Data\Microsoft\Outlook
      * Windows 7: C:\Users\%username%\Appdata\AppData\Roamingl\Microsoft\Outlook
2. Copy 'Outlook.nk2' to a safe location, e.g. a USB drive
3. On the new computer copy 'Outlook.nk2'to 
      * Windows XP: C:\Documents and Settings\%username%\Application Data\Microsoft\Outlook
      * Windows 7: C:\Users\%username%\Appdata\AppData\Roamingl\Microsoft\Outlook
4. Open the 'Run' window by pressing the 'Windows (Flag) button' and 'R'
5. Type outlook.exe /importnk2, and then click OK.
6. This should import the .nk2 file into the Outlook 2010 profile.
What if it didn't work??
As mentioned the file may be named something else depending on the name of your Outlook profile. You need to check that the file is named the same as your Outlook 2010 profile.
To do this:
1. Click Start, and then click Control Panel
2. Double-click Mail
3. In the Mail Setup dialog box, click Show Profiles.

Thursday, February 7, 2013

Adobe Toolbar Missing in IE

A number of people have had problems with displaying the Adobe Toolbar in Internet Explorer 8/9 after upgrading to Adobe Reader 10 (X).


You need to fix this in the Adobe Reader/Writer software NOT in IE. Here is the solution:

Open up Adobe Reader/Writer.
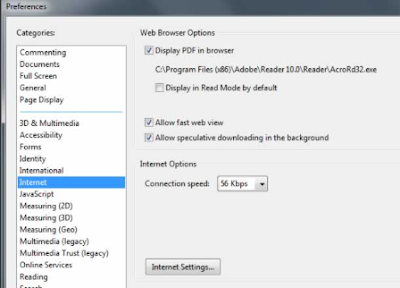
Go to Edit – Preferences
Click on Internet
Remove the Tick from the Display in Read Mode by Default box


You should now find that the toolbar is back when you open a PDF in IE.
Hope this works foryou – it did for me.

Thursday, January 17, 2013

How to use Multibeast 5.2 for Mountain Lion

A comprehensive guide for Mountain Lion


Recently, tonymacx86 released Multibeast 5, a version of Multibeast customized specifically for OS X Mountain Lion, Apple's newest version of Mac OS X. The layout of Multibeast has been revamped, and many incompatible and outdated options have been removed. Even so, opening Multibeast can be an intimidating experience for anybody new to Hackintoshes. This guide is here to help. 

Multibeast, by tonymacx86, is a essentially an installer bundled with a lot of kext files for Hackintoshes. When you're setting up Mac OS X, it can be a huge time saver. By using Multibeast, you don't have to find, download, and install every single kext file that your Hackintosh needs, one by one. Multibeast has it all. However, the problem with Multibeast's all-in-one method is that there are simply too many options to make sense of. In this guide, I'm going to explain the function of several important options in Multibeast.

NOTE: You have to register on tonymacx86.com to download Multibeast and related apps. After installing anything in Multibeast, you should reboot your Hackintosh to see if the changes worked.

Easybeast/UserDSDT/DSDT-Free Installation
These options are the cornerstone of the tonymacx86 method; installing either of these two packages will enable Mac OS X to boot from the hard drive of your Hackintosh, without any extra assistance.

UserDSDT or DSDT-Free Installation is the better method of the two. On most motherboards made before 2012, it only works if your motherboard has a DSDT file available. DSDT files are configuration files that customize Mac OS X to work with your specific motherboard. If your motherboard has a DSDT file available in the DSDT section of tonymacx86, use it. To install UserDSDT on Mac OS X this way, you first have to download the appropriate DSDT file, rename the file "DSDT.aml" (without quotation marks), and place it on the desktop of Mac OS X. Then you can run Multibeast.

When installing UserDSDT with a DSDT file, make sure that your motherboard has the right BIOS version, or the DSDT file won't work. For example, a DSDT file for version F4 won't work if your motherboard has version F1. Read this to learn how to update your BIOS version.

However, if you have a newer Gigabyte-brand motherboard that uses UEFI instead of BIOS, you don't need a DSDT file. You can just install UserDSDT in Multibeast without doing anything else beforehand. If you have a non-Gigabyte motherboard that uses UEFI, it's the same deal, except that you will have to install a patched version of your motherboard BIOS in addition to UserDSDT.

Easybeast Installation is similar to UserDSDT, except it tries to remove the need for a DSDT file by installing some extra kext files. If your motherboard doesn't have a DSDT file available for it and isn't a motherboard with UEFI, try installing Easybeast instead. Easybeast will break sleep mode and speedstepping (CPU power management).

Drivers & Bootloaders -> Drivers -> Audio
All of the motherboards recommended by tonymacx86 use Realtek Audio. To enable sound on these motherboards, you'll want to install the Realtek ALC8xx kexts. Luckily, the Realtek ALC8xx section of Multibeast 5 is pretty straightforward.

All you need to know is the audio codec of your motherboard. You can find your audio codec by Googling the model of your motherboard. The first Google result will be the motherboard's official product page. The audio codec is usually found under the "Specifications" section, or some other similarly-named section. For example, my Hackintosh has a Gigabyte GA-P67A-D3-B3 motherboard. According to the official product page, this motherboard uses the Realtek 889 codec.

Once you've found your audio codec, choose the corresponding option in Multibeast. Each codec as two different possible setups: one for Hackintoshes that use a DSDT file, and one for Hackintoshes that don't. On my own Hackintosh, I used a DSDT file, so I would choose ALC889 under the "With DSDT" section to enable audio.

If you have a motherboard that doesn't use the Realtek audio codec (or it has an unsupported codec version), you'll have to go with the VoodooHDA kexts. VoodooHDA enables sound for a wide variety of motherboards, but it's not very reliable. Install just one of the versions and reboot to see if it works well for you. If not, remove the kext by going to /System/Library/Extensions in your hard drive and deleting VoodooHDA.kext. Then try another version.

Drivers & Bootloaders -> Drivers -> Disk
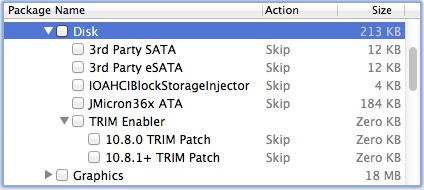
Almost all hard drives should work with Mac OS X by default, but you still might encounter glitches here and there. These kexts fix hard drive-related problems.

For example, on some Hackintoshes, your hard drives will show up as orange external drives on your desktop. Install IOAHCI Block Storage Injector to fix that (this kext should be unnecessary if you install UserDSDT).

You can also install TRIM Enabler to enable TRIM in Mac OS X, which is a critical feature for SSD drives. OS X Mountain Lion version 10.8.0 requires a different patch to enable TRIM than Mountain Lion version 10.8.1 (and higher), so install whichever patch is right for your computer.

Drivers & Bootloaders -> Drivers -> Graphics
All of these patches enable graphics support on various graphics cards, so that the cards can display at full resolution. In Mac OS X, some cards work out of the box, without the need for extra drivers. This is generally true for most older NVIDIA graphics cards, as well as for most AMD Radeon HD graphics cards in the 6600 and 6800 series.

Intel's 2nd-generation "Sandy Bridge" processors are compatible with their 3rd-generation "Ivy Bridge" motherboards. The same is true the other way around: Ivy Bridge processors are also compatible with Sandy Bridge motherboards. However, building your Hackintosh with these mixed configurations prevents your processor's integrated graphics from working properly in Mac OS X. Install Intel Graphics Patch for Mixed Configurations to fix this problem. Remember, only HD 3000 and HD 4000 graphics work in Mac OS X.

The NVIDIA Fermi patches are version-specific, meaning that you have to install a new patch every time you update to a new version of Mac OS X. 10.8.x OpenCL Patch works for pretty much any graphics card in NVIDIA's 400, 500, and 600 series. The 10.8.0+ OpenCL Patch under the ">2GB OpenCL Patch" section does the same thing, except it works for NVIDIA cards with 2 GB or more of video RAM.

NVIDIA also offers official graphics drivers for Mountain Lion, which do the same thing as the Multibeast patches. For some graphics cards, the drivers will also fix graphics glitches in Mac OS X. However, OpenCL does not currently work on the newest version of the official NVIDIA drivers, version 304.00.00f20. To enable OpenCL while using these drivers, you must install the NVIDIA Retail patch.

Drivers & Bootloaders -> Drivers->Miscellaneous/System

The Miscellaneous and System sections contain kexts that fix random issues in Mac OS X. In Multibeast 5, the difference between these two sections is very unclear, so I've included explanations for both sections.


NullCPUPowerManagement (NCPM) fixes boot errors caused by Apple's CPU power management service. These errors happen on Hackintoshes that aren't using UserDSDT. Installing NCPM breaks sleep mode and speed-stepping (CPU power management). This kext is installed by default when you run Easybeast.

The FakeSMC Plugins are a set of plugins that enable system-monitoring apps to read your Hackintosh's CPU temperature and GPU temperature. However, the NVIDIA GeForce Plugin causes kernel panics if your Hackintosh uses a graphics card from the NVIDIA 600 series.

Installing USB 3.0 - 3rd Party supposedly enables USB 3.0 support on Hackintoshes, but it's a hit-and-miss feature: it works for some people, and causes booting errors for others. So if you're setting up a Hackintosh, don't count on USB 3.0 support.

If you're using an older mouse or keyboard that doesn't connect to your Hackintosh with a USB port, install PS/2 Keyboard/Mice.


If your Hackintosh is having problems with booting because your BIOS settings keep resetting every time you reboot, try installing ElliottForceLegacyRTC and EvOreboot. If you're experiencing this issue on Mac OS X Lion, install AppleRTC Patch for CMOS Reset. All of this stuff is installed by default in Easybeast, and AppleRTC Patch is installed by default in UserDSDT.

If your Hackintosh uses an older LGA1156 motherboard and the USB ports aren't working properly, try installing Legacy USB Support. LGA1156 motherboards are the ones that support the first generation of Intel Core processors.

Patched Apple Intel CPU Power Management is an alternative to NullCPUPowerManagement. It does the same thing as NCPM, except it doesn't break sleep mode or speed-stepping. However, these patches are version-specific, so every time you update Mac OS X, you'll have to install a new version of the patch.

Mac OS X Lion 10.7.4 removed support for X58 motherboards, making Hackintoshes that use these motherboards unable to boot without help in Mountain Lion, even after installing UserDSDT or Easybeast. 10.6.8 Rollback for ASUS X58 System fixes these booting problems.

Also, many motherboards (not just X58) encountered booting problems in OS X Mountain Lion version 10.8.2 due to driver incompatibilities. If your Hackintosh cannot boot normally after updating to version 10.8.2, boot into Mac OS X with the help of your Unibeast USB drive (or whatever installer USB drive you used), and install 10.8.1 Rollback.

Drivers & Bootloaders -> Kexts & Enablers -> Network
These kexts should enable connecting to the internet on your Hackintosh, via an Ethernet cord. To find out which kext you need to install, you need to know what ethernet controller your motherboard has.


Every mid-end to high-end Gigabyte motherboard that's supported by tonymacx86 has the 8100 series of controllers. However, different manufacturers use different controllers; for example, some ASUS motherboards also use the 8100 series, while other ASUS motherboards use the 82500 series. Check what controller your motherboard uses by Googling its name (or model number) to find the official manufacturer webpage for it. Most manufacturers list the ethernet controller of a motherboard under the "Specifications" section of its official page.

If your motherboard uses the Realtek 8100 series of Ethernet controllers, try installing the Realtek - AppleRTL8169Ethernet first. If not, try installing Lnx2Mac's Realtek driver, which works better for some people.

Shailua's ethernet kext works on motherboards with an Atheros AR8100 series ethernet controller, and hnak's ethernet kext works on motherboards with an Intel 82500 series ethernet controller.

Customization -> Boot Options
Most of the options in the Boot Options section make edits to org.Chameleon.boot.plist, a settings file that configures how your Hackintosh boots. You can make all these changes manually. Check out our list of common boot options for more details.

If your Hackintosh isn't booting from the hard drive properly, or you're getting verifications errors in the Mac App Store, changing your PCI Root ID with PCI Root ID Fix may be able to solve the issue. This option does the same thing as using the PCIRootUID=1 boot flag.

If your Hackintosh's bootscreen automatically loads Mac OS X instead of giving you the option to choose your own hard drive, install Instant Menu.

Customization -> System Definitions
System Definitions pretend that your Hackintosh is a real Mac. The Mac Pro (3,1) system definition is installed by default with UserDSDT and Easybeast.

Occasionally, a certain System Definition will make your Hackintosh run a lot slower than it should. Geekbench is a good benchmark to compare your Hackintosh against other Hackintoshes and Macs (the free trial lasts forever). If you feel that your Geekbench score is unusually slow compared to Hackintoshes or Macs with similar hardware, try installing a different System Definition.

Generally, any system definition will work. The only exceptions are the the Mac Pro (4,1) and Mac Pro (5,1) system definitions, which cause booting problems. If you insist on installing either of these two system definitions, be sure to remove AppleTyMCEDriver.kext and AppleGraphicsPowerManagement.kext from /System/Library/Extensions beforehand (the system definitions mess up these two kexts).

If you want to enable the built-in HD3000 graphics of your Intel Sandy Bridge processor, the built-in HD4000 graphics of your Intel Ivy Bridge processor, or AirPlay mirroring, then you should install the Mac mini system definition.


Installing Mountain Lion 10.8 DP1 On A Hackintosh


  1. Step 1: Formatting Your USB Drive
    1. Open Disk Utility.
    2. Click on your 8gb flash drive in the sidebar.
    3. Click on the erase tab.
    4. Choose "Mac OS X Extended [Journaled]" as the format.
    5. Give it a name, I named mine "Installer"
    6. Click the erase button... this will erase everything on the USB.
    7. Done, close out of disk utility for now.

    Step 2: Moving 10.8 To Flash Drive
    1. Run the ShowHiddenFiles application inside the mountain lion files.
    2. Click show special files, this will show files that are hidden in OSX.
    3. Run the DMG for Mountain Lion (will be called Mac OS X Install ESD on your desktop).
    4. Inside Install ESD there will be "BaseSystem.dmg", run it.
    5. Open disk utility.

    6. Click on your flash drive in the left sidebar.

    7. Click on the Restore button in the middle area.

    8. Drag “Mac OS X Base System” from your desktop into the empty Source box.

    9. Drag your USB drive from your desktop into the empty Destination box.

    10. Make sure that “Erase destination” is checked.

    11. Click on “Restore”. This process will take anywhere from 5 to 10 minutes.

    12. When it’s finished, you’ll end up with 2 “Mac OS X Install ESD” drives on your desktop. 13. Figure out which one is your USB copy (you can right-click, Get Info and use the capacity as an indicator), and open it.
    14. Once you’ve opened up Mac OS X Install ESD (the one that’s your flash drive), go to /System/Installation.
    15. You’ll see a symlink for Packages. Delete it.
    16. Create a folder called Packages, make sure the P is capitalized!
    17. Open up a window of the original Mac OS X Install ESD drive and copy everything within Packages to the empty Packages folder on your USB drive.
    18. Done! 

    Step 3: Making The USB Bootable
    1. Open up the "Mountain Lion Files" that you downloaded earlier.
    2. Copy the two kext files (fakesmc and nullcpu...) to System/Library/Extensions on your USB drive.
    3. Copy the OSInstall file (not the .mpkg) to System/Library/PrivateFrameworks/Install.framework/Frameworks/OSInstall.framework/, overwriting the file that's already there.
    4. Copy OSInstall.mpkg (the box) to System/Installation/Packages, overwriting the one that is already there.
    5. Run Chameleon (inside Mountain Lion Files), change the install location to your flash drive.
    6. Under customize install an SMBIOS that you use normally use, in my case I chose Mac Pro 3,1.
    7. You can also install some boot-flags like Darkwake=0 if you know you need them.
    8. Install 
    9. Once installed, copy the mach_kernel file from the root of Mac OS X Install ESD and paste it onto the root of your flash drive.
    10. Done! Now we can boot off our USB and install 10.8!
    11. One more thing... make a partition in disk utility where you will install 10.8 to. Make it at least 20 GB.

    Step 4: Installing 10.8 From USB
    1. Boot from USB
    2. Once inside Chameleon, arrow down to your flash drive (Base System) and push enter.
    3. Assuming your hack did't KP, you should get to the installer.
    4. Continue and choose where you will install and click "install"
    5. This process can take anywhere from 5 to 25 minutes. Quick Tip- Move your cursor every once in a while to avoid letting the system freeze.
    6. Once the install finishes, boot back into a working OSX partition.

    Step 5: Preparing The 10.8 Partition
    1. Open up your 10.8 partition and "Mountain Lion Files"
    2. Copy the two kext files (fakesmc and nullcpu...) to System/Library/Extensions on your 10.8 Partition.
    3. Copy the OSInstall file (not the .mpkg) to System/Library/PrivateFrameworks/Install.framework/Versions/A/, overwriting the file that's already there.

    Step 6: Booting Up 10.8 Mountain Lion!
    1. Reboot and boot into your USB again, this time select your 10.8 partition.
    2. You should end up getting to the setup screen, just go through the setup like normal.
    3. Once on the desktop, figure out what you need. I needed audio, ethernet and graphics.
    4. Navigate to your Mountain Lion Files and run chameleon.
    5. Install an Smbios and anything else you might need. I installed Mac Pro 3,1 for an Smbios and Graphics Enabler =Yes and BuiltInEthernet = yes.
    6. Once that is installed, run multibeast and install and remaining kexts. I installed Audio and Lnx2mac ethernet and ran system utilities. (You will most likely get 2 errors, just ignore them)
    7. DSDT USERS! To install a DSDT, don't run USERDSDT, instead copy it into your Extra folder and run System Utilities inside of Multibeast.


DONE!
At this point you can restart and boot straight from that partition! Remember, this is only DP1 so it's a possibility than you may have issues. I for one can say that I have no issues at this point, everything works including iCloud. I can run CS5 apps and Final Cut Pro X with no issues. If you have any issues feel free to ask questions, just keep in mind that this install method isn't completely "official" so for the best help and support, we will have to wait until summer when official install methods are released.


Video Tutorial: